This tutorial includes everything you need for getting ready to record at home.
We will discuss sound and visual quality, thus improving your students’ learning experience. Lastly, we’ll discuss scripting and rehearsing, recording in PowerPoint, and submitting your content.
Page Contents
Sound Quality
An essential part of creating a high-quality presentation is ensuring consistent, high-quality audio.
Microphone
Using a microphone meant to record voice is important, rather than repurposing a headset for voice calls or cellphone use. We recommend using a lapel mic like this one, though you can opt for a nicer microphone at your discretion.
A lapel or lavalier mic should be centered on the chest at least 8-10 inches away from your mouth, on the outside of your clothes, where it will not be rubbed by hair, clothing, or other accessories.
Once you have chosen a microphone, do a few test recordings to choose the best place to attach it. Place your microphone in the exact same location each time you record.
Environment
Choose a quiet location away from windows or doors for recording. Be aware of ambient noises like echoes, fans, outdoor noises, or running water that students might hear on your recording.
Keep a glass of water nearby and take a sip between recordings.
Consistency
It is important to record with the same equipment in the same setting each session. Especially when using voice-over PowerPoint, an inconsistent recording environment will produce sound variations that can tire or annoy the listener.
Place your microphone in the exact same location—at the same distance from your mouth—each time you begin recording.
Plugging in your Microphone
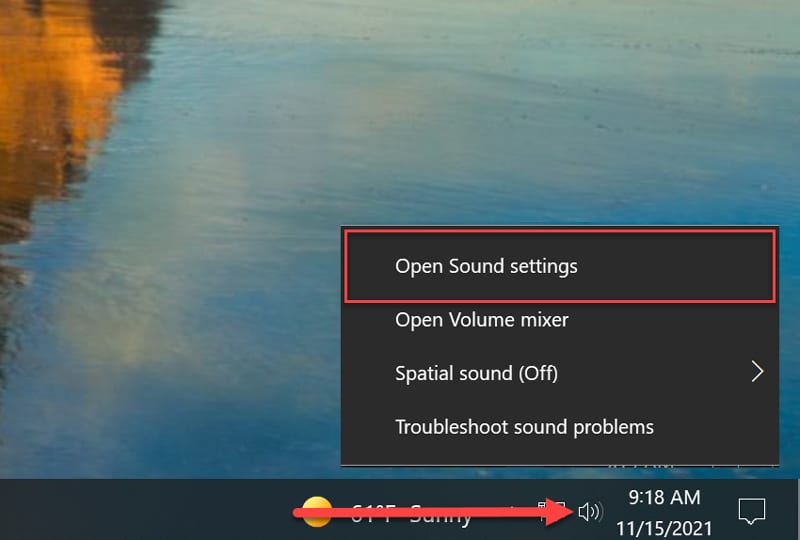
When you plug in your microphone, ensure your computer uses the newly plugged-in microphone instead of any system default microphones. To do this, find the volume or speaker icon on the right-hand corner of your computer’s taskbar. Right-click the icon and click “Open Sound settings.”

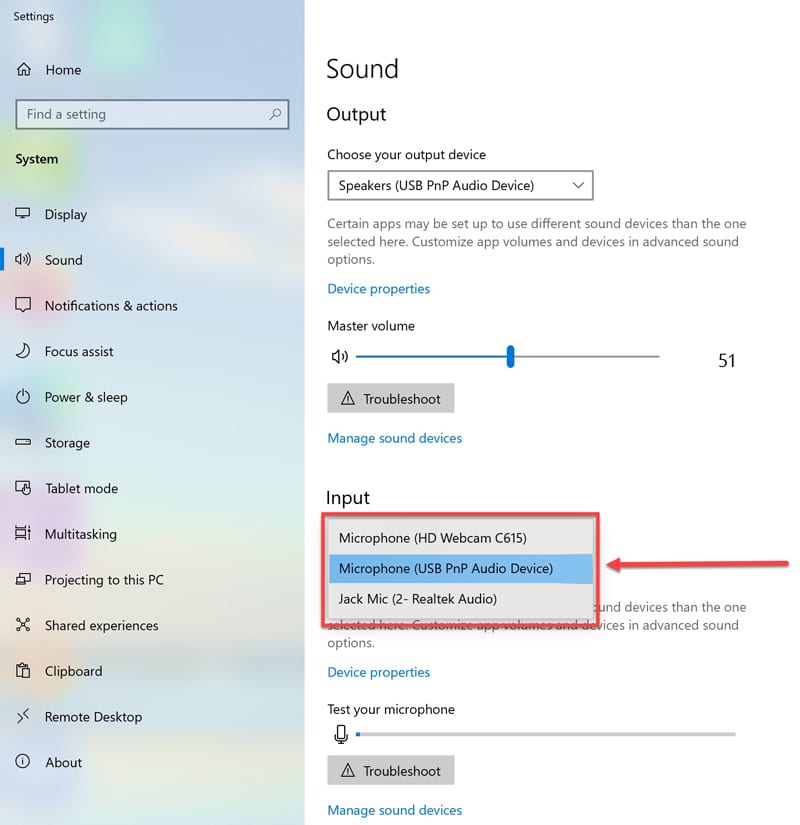
You can select your input device and test your microphone within the Sound settings. Make sure to choose the USB Mic.

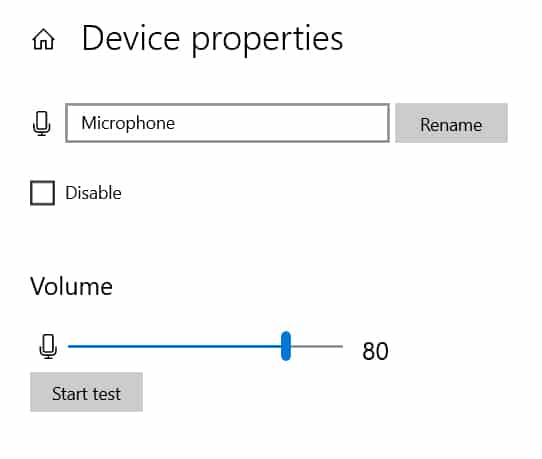
Additionally, adjust the input volume setting to ensure a consistent sound level. In the same Sound menu—within the Input section—click Device Properties.
In the Device Properties dialog window, adjust the volume to 80%.

If the first few seconds of your recording are much louder than the rest, lower the input volume to reach an even sound level.
Visual Quality
While audio quality is half of the final video, the visual quality of your presentation is also important. Here are some key principles to keep in mind when creating a presentation.
- Leave out dates, room numbers, and other specific information that may become outdated next semester.
- Create a title slide for each topic.
- Set the stage for learning by starting the presentation with an “Objectives” or “Outcomes” slide.
- Give your presentation closure by wrapping up with a reflection question or question to consider.
- Consistency – use the same slide design, theme, and font throughout your course.
- Keep to one message or key idea per slide.
- Font – 24-point minimum font size. Avoid fancy fonts.
- 3-5 items per slide, leaving sufficient white space
- Color & contrast – Ensure fonts contrast sufficiently with the background. Use light-colored text on dark backgrounds or dark-colored text on light backgrounds. Avoid red + black combinations as well as red + green combinations. Avoid orange and yellow text.
- Images – use images purposefully. Include high-quality images to illustrate concepts. Don’t use pixelated, small, or blurry images.
- Avoid images of text such as screenshots of text.
- Avoid large blocks of text. (The human brain cannot process complex written information simultaneously with spoken information.)
Scripting & Rehearsing
Before recording, it is beneficial to know what you will say. Scripting and rehearsing make your presentation sound more polished and professional. It also saves you time by reducing the need for re-recording and editing to produce the final video.
Some presenters script every word, while others simply prepare an outline or notes for each slide. The important thing is to spend time thinking about what you want to say and practicing your delivery. While this may feel awkward initially, the process becomes more streamlined and comfortable with practice. The payoff in high-quality videos is well worth it.
Scripting with Google Voice Typing Tool
Recording with Voice over Powerpoint
A great way to create recordings of your lectures is to record your voice within PowerPoint. This method allows you to record in short increments, annotate on your slides, and re-record specific portions of your video without re-recording your entire video.
We recommend recording audio only and not including video from your webcam or picture-within-picture recording of your face. As a result, recording at your own pace will be even easier.
How to Create Videos Using Voice over PowerPoint
Submitting your Content
Very important: Watch your created video in its entirety to review for errors before submitting your content.
Name your video following all file naming conventions as detailed by project guidelines. A common logistical problem that eSAIL encounters is the inability to identify video submissions because of naming irregularities.
Then, upload your video and the original slide deck corresponding to your video in the folder designated by your project lead.
Related Content
- High-Quality Video Setup (Video Essentials) (4 min.)
- Upload Videos to YouTube (4 min.)
- Accessibility Tips for PowerPoint (25-min. webinar)

Leave a Reply