Following this guide will help you create an accessible Word document (and thus, PDF) for all your students. Using accessible course materials is essential, so every student has an equitable opportunity to succeed in your course.
Fundamentals & Word-Specific Accessibility Elements
There are fundamental elements for developing digital content throughout all Office programs, and then there are Word-specific accessibility elements that we’ll discuss in more detail in this tutorial.
Fundamental accessibility elements:
- Alternative Text for Images
- Descriptive Hyperlinks
- Contrast & Color
First, all Word documents need the accessibility fundamentals in place to create an accessible Word document. Then, there are some things specific to Microsoft Word that you need to pay attention to.
Word-Specific Accessibility
- Word’s Accessibility Checker
- Add Accessibility Checker to your Quick Access Toolbar
- Create a Hierarchical Heading Structure
- Data Tables
- Add a Document Title
- Converting to an Accessible PDF
- Conclusion
Word’s Accessibility Checker
Microsoft Word has an internal accessibility checker to help you find and fix accessibility issues in your documents. This checker runs automatically in the background but may go mostly unnoticed unless you have it open.
Click Review > Check Accessibility to run the checker manually.
The accessibility checker will tell you why certain content may be problematic to students with disabilities. It will also give suggestions for how to fix each issue (better if you have Office 365).
In-Depth Instructions:
See our Using Word’s Accessibility Checker tutorial to see more details on how to use it.
Add Accessibility Checker to your Quick Access Toolbar
“Shifting left” in software development is the idea of integrating accessibility, testing, and QA practices earlier in the development cycle. The approach has considerable benefits, including early bug detection, improved customer experiences, and reduced cost.
The same applies to checking Word (or PowerPoint) documents for accessibility issues. The earlier you start, the quicker you’ll be able to find and fix issues. Ultimately, this means less time is spent overall to ensure your documents are accessible for everyone.
If you don’t want to always keep the Accessibility Checker open, add Word’s accessibility checker to your Quick Access Toolbar. This ensures the “Accessibility Checker” icon is always visible.
It will be a constant reminder to check for issues early in the process rather than waiting until the end. If you wait, several issues may pile up, and it will take significantly longer to fix them all.
Create a Hierarchical Heading Structure
Headings are essential to Word (and most other) documents because they give the document structure. This hierarchical structure allows students to scan and navigate the document visually or with assistive technology, like a screen reader.
But this only works if headings are set properly (as styles) and if the hierarchy is well formed.
Tips for Creating Accessible Headings
- Use Heading 1, Heading 2, Heading 3, etc. styles already created in Word (on the Home tab).

Figure 1. Word’s Heading Styles in the Home Ribbon - Create a well-formed heading hierarchy for your document.
- Use the Heading 1 style once per document or webpage.
- Don’t skip heading levels (e.g., from a Heading 1 to a Heading 3).
- Open the Navigation Pane (View > Navigation Pane) while you work on an Office document’s headings. Consequently, you’ll be more likely to notice empty headings and skipped heading levels.

In-Depth Instructions:
For more details, check out our How to Create Accessible Headings tutorial. (Or, go directly to our well-formed heading hierarchy example.)
Data Tables
Data tables display information in a grid or matrix. They contain header columns and/or rows that explain what the information in the grid means.
Figure 2 shows a simple data table created in Microsoft Word with a style you can find on the Design tab.

Sighted students can scan tables to make associations between data in the table and their corresponding headers. Screen readers can provide those associations for your students, but only if you create the associations.
Tips for Creating Accessible Tables
- Use tables for data only, not for layout.
- Tables should contain no merged, split, or blank cells.
- Every table in Word should contain a header row.
- Break down complex tables into multiple simple tables.
- Never use spaces to emulate a table; use a table object.
Simple Instructions – Insert a Table
- Choose Insert > Table to insert a table.

Figure 3. Insert a table into your document. - Choose the size of your table. Boxes across are your columns, and boxes down are your rows.
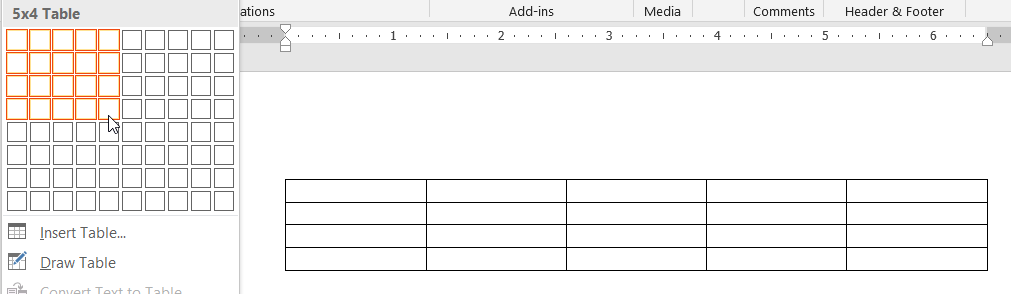
Figure 4. Five columns across and 4 rows down create the displayed table. Caution: Do not use the Draw Table feature. This feature creates an image of the table and hides the table’s contents from screen reader users. - Type column headers into the first row of your table.
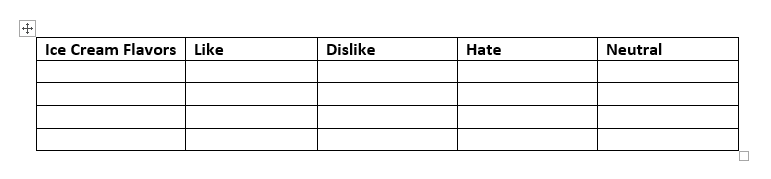
Figure 5. The 1st row now contains your column headers.

Simple Instructions – Set Table Headers
Next, to associate the headers with their data, assign the first row in Table Properties as the header row.
Make the first row a header row:
- Select the first row of your table.
- Right-click the row and select Table Properties from the resulting context menu.
- On the Row tab do the following:
- Uncheck Allow row to break across pages.
- Check Repeat as header row at the top of each page.
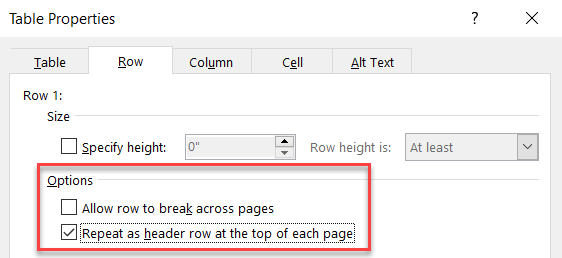
Figure 6. The Table Properties’ Row tab.
- Click OK to save your changes.
For more detailed information about data tables, see our How to Create Accessible Tables in Microsoft Word tutorial.
Add a Document Title
If you plan to convert your Word document to a PDF (e.g., for secure sharing), add a document title first. (Do the same for PowerPoint presentations.)
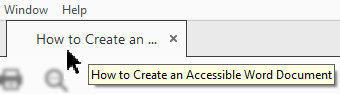
Screen readers read this title to students instead of the filename. Accordingly, the document title should be an easy-to-read replacement. (Copy and paste your document’s Heading 1; that would likely suffice.)
Sighted students will see this title instead of the filename on Adobe Reader’s PDF tab. Again, students using a screen reader hear this title instead of the filename. Therefore, this title should be helpful for all your students.
Simple Instructions
- Go to File > Info > Properties > Title.
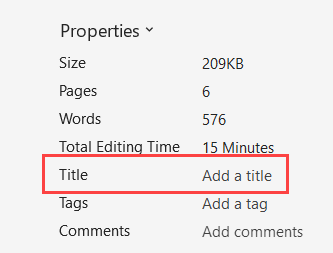
Figure 7. The Title Property is in the File’s Properties section. - Click “Add a title” and type in an easy-to-read title into the textbox. (Example: “ENGR 101 Fall 2026 Syllabus”)
Unfortunately, Word’s accessibility checker doesn’t flag a missing document title as an accessibility issue. So, you’ll have to remember on your own, refer to this guide, or Canvas will remind you upon upload. (The 3rd option is truly the most time-consuming.)
For more details, see our How to Add a Document Title to a Word Document tutorial.
Converting to an Accessible PDF
Instructors primarily use PDFs for their students’ course materials. Though a Word document may be more accessible to share with students, PDFs usually provide more security.
Adobe PDFs can be shared, viewed, and printed by anyone on any system using free Adobe Reader software. Regardless of your operating system or the original application used to build the document, anyone can access that PDF. (If it’s accessible, that is.)
Once you’ve fixed all accessibility issues, then you can convert your Word document into an accessible PDF.
Please see How to Convert a Word Document into an Accessible PDF for detailed instructions!
Conclusion
Word’s accessibility checker can’t find all issues for you, so knowing the fundamentals and using the checker together can help. The result is that every student benefits and gets an equitable chance to succeed in your course.

Leave a Reply