When it comes to accessibility, one of the best things about Microsoft Word is its internal Accessibility Checker. It’s never been easier to find and fix accessibility issues in your documents — especially if you have Microsoft 365!
Unfortunately, automatic checkers will never find every accessibility issue in your documents. You must also perform manual checks to ensure your documents are accessible for everyone. You can find problems your automatic checker cannot see. (See our How to Create an Accessible Word Document tutorial to see key elements that make up an accessible document.)
This tutorial introduces you to how Microsoft Word’s Accessibility Checker works.
Page Contents
Finding the Accessibility Checker
Easiest: Add it to your Quick Access Toolbar
The simplest way to repeatedly use the Accessibility Checker is by adding it to your Quick Access Toolbar. If it’s always visible, you’ll remember to use it more often.

Add the Accessibility Checker to your Quick Access Toolbar
Other Ways to Find the Accessibility Checker
There are 3 more ways to find the Accessibility Checker within Microsoft Word, each increasingly more difficult to find:
- At the bottom-left of Word, you’ll see text such as “Accessibility: Good to go” or “Accessibility: Investigate.” Click the text to bring up the Accessibility panel.

Figure 2. Bottom-left text in Microsoft Word – Accessibility: Investigate (It’s good to review the checker regardless of what it states at the bottom-left of Word. Sometimes, issues appear in the checker that haven’t yet triggered “Investigate” to display.)
- In the Review tab, click the icon above the words “Check Accessibility.” Or click “Check Accessibility,” then “Check Accessibility” in the drop-down menu. (Clicking the icon is one less step, thus quicker.)
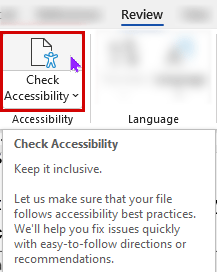
Figure 3. Check Accessibility icon on the Review tab - Go to File > Info > Check for Issues > Check Accessibility to open the Accessibility Checker panel.
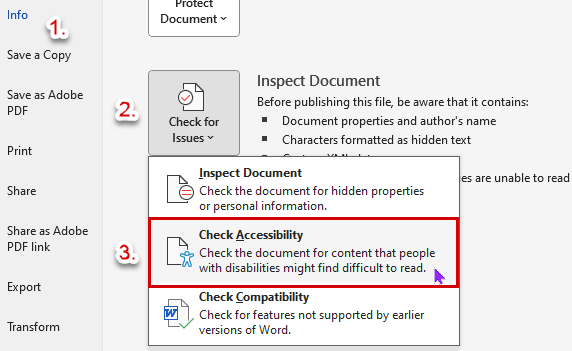
Figure 4. Check for Issues button, then Check Accessibility


It’s best to add the Accessibility Checker to your Quick Access Toolbar to find it quickly and use it often.
Using the Accessibility Checker in Microsoft Word
Now, let’s see how Word’s Accessibility Checker works!
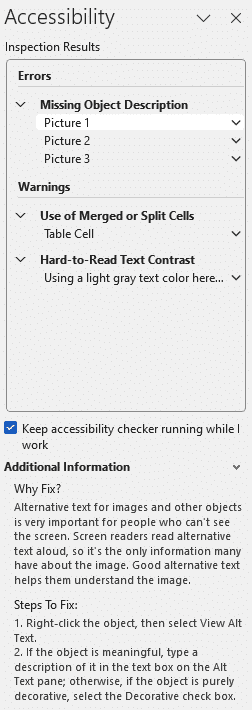
Open an existing Word document and Word’s Accessibility Checker panel. Accessibility errors and warnings are displayed in the side panel, errors first. (They’re the most important to fix, so they’re prominent.)
This Word document has the following issues:
- 3 images are missing alternative (or “alt”) text
- Merged or split cells exist in a table
- There is insufficient contrast between some text and its background.
Selecting the category (e.g., “Missing Object Description”) toggles the list from expanded to collapsed. All categories are expanded in this image. Collapsing a category allows lets you focus on whatever you’re attempting to fix.
When you click an item within a category, like “Picture 1,” additional information appears below, telling you:
- Why it needs to be fixed
- Steps to fix it
Fixing Accessibility Issues in Microsoft Word
As stated above, clicking an error or warning shows Additional Information to help you fix the problem. At the same time, Word selects the content and moves you to that location in your document. Therefore, you can immediately see the problematic content and start fixing it.
Additionally, Microsoft 365 has added an incredibly helpful feature. Now, when you click an error or warning, you’re also provided recommended actions to fix the problem. We’ll go through a quick example.

After clicking “Picture 1,” we’re brought to the image; it is selected, and the Recommended Actions menu appears. Here, we can bypass any steps listed in the Additional Information section. Clicking “Add a description” or “Mark as decorative” takes us directly to the proper panel to fix the error. (In this case, the “Alt Text” panel appears.)
You don’t even need to read the instructions to see what you need to do! Microsoft Word takes you exactly where you need to go to fix the problem.
Continue working with the Accessibility Checker panel until you’ve fixed all errors and warnings in the checker.
Microsoft Word Accessibility Checker References
- Improve accessibility with the Accessibility Checker
- Apply Recommended Actions (Microsoft 365)
- Rules for the Accessibility Checker
- Make your content accessible in the Microsoft 365 apps
Conclusion
Although Word’s Accessibility Checker cannot find every issue within your documents, it’s an excellent place to start. Using the Accessibility Checker and manually checking these key elements is the best way to consistently build accessible documents.
Use the Accessibility Checker early in your development process to learn how to fix various accessibility issues. Otherwise, you’ll waste significant time repeatedly fixing the same types of problems. Over time, you’ll start to build accessibility into your documents automatically and lean less on the Accessibility Checker.

Leave a Reply